
FANTASTiC | 25 March 2026 | 12 KB
人声处理,尤其是原始人声的处理,耗时可能和混音本身一样长。这个过程主要包括以下几个步骤,我通常按以下顺序进行:
•调音
•编辑(去除爆音、咔嗒声,处理呼吸声)
•时值
•效果处理。
调音
本身比较简单,但显然不如使用自动调音那么直接。自动调音是一种效果器,它会随着时间推移将所有音高调整到音阶上最接近的音符。我个人使用 Wavestune(类似于 Melodyne,你也可以试试),它是一种更手动的调整方式,你可以调整所有音符或每个音符。在这个过程中,你需要将任何错误的音符移动到正确的位置,并控制音符修正的“速度”。速度太快,你会听起来像 T-Pain;速度太慢,则几乎无法修正。一般来说,修正速度要足够快,使人声的音高听起来正确,但又不能太快,以免听起来不自然。
人声调好音后,你需要将其导出为单独的音频文件。
编辑
这个文件可能是最耗时的部分,而且也包含一些细节。
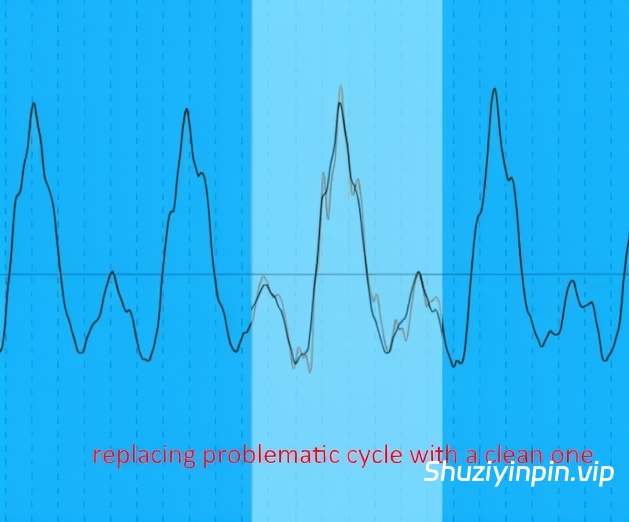
去除爆音和咔嗒声:我通常手动操作。虽然有一些插件,例如 Waves X-Click,专门用于去除爆音和咔嗒声,但我发现它们的效果始终不够彻底,无法完全消除所有爆音和咔嗒声。在深入处理之前,你最好先进行一些粗略(而非轻微)的处理,以便了解人声处理后的效果。同时,如果你在信号链中使用了某种多频段压缩,就能更清晰地听到爆音和咔嗒声。在处理人声时,仔细聆听是否有爆音和咔嗒声——一旦发现,就找到它们在波形上的位置。我的做法是,截取波形中没有爆音的相同部分(通常为一到两个周期),然后将其复制粘贴到爆音处进行覆盖。你一定要确保相位对齐并淡入采样,否则会遇到其他奇怪的瑕疵,比如闷音,甚至更多的爆音。
去除咂嘴声和过渡爆音:这些通常出现在单词或音节之间,尤其是在歌手轻声演唱时。由于你编辑的部分通常没有音调,所以不需要像之前的技巧那样进行相位对齐。80% 的情况下,我通常会直接删除有问题的部分(因为它不在任何单词或即兴演唱中),并将采样结尾淡入。如果不加以处理,再加上经过强力压缩(这种情况很可能发生),这些咂嘴声会让歌声听起来很闷,很不舒服。
控制呼吸音:这些是歌手在演唱下一句歌词时吸入空气时发出的声音。如果不加以控制,人声听起来就像在跑马拉松,这通常不太容易接受。根据呼吸情况,您可以缩短呼吸音的长度,或者仅在必要时降低音量。
手动调整部分增益以控制动态:如果人声的某些部分音量过大,您可以将其调低至您喜欢的程度。这一步的目的是手动平衡音量,避免压缩器过度工作。
编辑完成后,您务必将其导出为单独的音频文件,这样在调整人声时,您只需处理一个音频文件,而不是多个剪辑片段。
人声的时序调整
充满了陷阱,因为人声不像鼓循环那样瞬态清晰,您可以简单地将变形标记移动到量化线上。人声样本中会有渐强和很短的齿音起伏——以下是一些技巧:
在渐强部分,歌手可能在说“will”或“run”之类的词。我通常喜欢把标记放在单词开头,在R或W开始之前,并量化到你想要的音符。根据不同的风格,W或R可能起到弱起音的作用,所以时间标记可能放在W或R的中间。
对于齿音,歌手可能会说“tonight”之类的词。通常,我不会把标记放在“T”上,而是放在“T”和“O”之间的短促停顿处,或者“O”开始的地方。这是因为在大多数情况下,元音的第一个音在节奏上是合理的。当然,具体情况可能因人而异,在某些情况下,“T”可能更接近标记,所以记住这一点,多尝试,看看哪种听起来最好。
你不必对每个节拍、齿音或元音都进行精确计时。大多数时候,你可能只需要控制好四分音符或二分音符的节奏,让其他音符自然发展即可。如果你对每个音符都过于用力,它们听起来就会很不自然,或者你可能会在不知不觉中迷失在细节中,这很容易导致歌手唱错:“嘿,这不是我想要的效果!”
人声效果处理
可能是你项目中效果器用量最大的声音,因为它动态范围很广,而且通常位于混音的最前面。我通常不喜欢提及预设,因为每个声音和每个混音都各不相同,但我确实有一套目前为止一直用于原始人声的效果链(见附件)。应用后,你听不出区别——你需要根据实际情况调整每个设置。以下是按信号流顺序的说明。
预均衡:首先我切掉低频(在人声最低基频下方做一个柔和的拐点),然后进行大幅度的钟形调整来塑造整体音色——无需精细调整。任何均衡器都可以。
限制器:设置速度快,阈值高,以捕捉异常峰值——你不希望任何后置压缩器对这些峰值做出反应。根据情况进行调整(通常将阈值设置为人声的最高峰)。
压缩器:用于控制整体动态。我通常喜欢将阈值设置在主歌/过渡段的最高峰之上。
齿音消除器:在我提供的链中,你会看到一个音频效果器机架被分成两个频段,其中一个频段高于 6kHz,我在这里处理齿音。在这个高频段上有一个实用效果器(用于增益)和一个快速压缩器(用于齿音消除)。当你提高增益时,你通常希望元音的高音听起来自然、清晰,但又不会过于刺耳、生硬或嘶嘶作响。在增益提升阶段,我只关注元音,不去注意齿音。然后我会用压缩器处理齿音。我通常喜欢把阈值设置在齿音的起始位置(通常会用较高的压缩比和速度来压制它们)。阈值再低一些,声音可能会变得含糊不清——你需要留出一些空间来保持声音的自然感。我还会相应地降低压缩器的湿润度,这样就实现了并行压缩。这样做的目的是为了同时保留一些原始的齿音和压缩后的齿音,从而既保证了单词的清晰度,又保留了元音的气息感。
多频段压缩(推荐使用 Ozone 或其他母带处理多频段插件,这样可以有更多频段/设置,当然用自带的多频段压缩器也可以):这里我会更关注中频,并控制每个频段的动态范围。这完全取决于人声(和风格),所以我没有固定的公式来设置频段和压缩器参数。但显然,如果某个声音听起来很大或不稳定,你需要控制它,但同时也要避免过度,以保持自然的动态范围和人声的清晰度。在节奏较重的音乐中,多频段压缩通常会过头,但在较柔和的音乐,甚至是大多数流行音乐中,你希望人声有更多呼吸的空间,这样才能更好地从混音中脱颖而出。此外,虽然我们已经进行了齿音消除,但我有时仍然会使用轻微的压缩设置来调整高频,作为对该频段的整体调整,使其更好地融入混音。
均衡后处理:在这里我会对音色进行最终调整,有时会使用小Q值/精准的衰减。虽然你可以使用任何均衡器进行调整,但你最好使用线性/无相位均衡器,以避免任何相位问题——尤其考虑到人声的突出程度。
顺便说一下,这只是针对主唱的。你当然也可以对伴唱、和声、即兴演唱重复这个步骤,但我发现你可以省略一些步骤,因为它们通常在混音中比较靠后。最后,你终于可以根据自己的喜好给歌声添加延迟/混响效果了!
Vocal Processing raw vocals are one of those things that takes probably just as much time as the rest of the mix itself. the process involves these main things, and i do them in this order:
•tuning
•editing (removing clicks, pops, managing breaths)
•timing
•effect processing
Tuning
pretty straightforward, but obviously not as straightforward as putting autotune on it however, which is a process where the effect aligns all pitches to the nearest note on a scale over time. personally i use wavestune (also similar to melodyne which you can also use), which is a more manual process where you can adjust all or each note that is sung. during this process you want to move any incorrect notes to the correct place and manage how “fast” you want those notes to correct. too fast and you’ll sound like t pain, too slow and you won’t get much correction if at all. as a standard, you want it fast enough so that the vocal’s pitch sounds correct, but not to a point where it sounds too unnatural.
after you tune your vocals you want to bounce it into its own audio.
Editing
this is probably the most time consuming part and there’s also some parts to this.
removing clicks and pops: i do this manually. while there are plugins such as waves x-click designed to remove clicks, i never find it thorough enough to remove all clicks and pops. before you dive into removing them, you def want to put rough (not light) processing so you get some idea of how your vocals will sound when processed. At the same time, you’ll be able to hear pops and clicks more audibly assuming you’re using some sort of multiband compression in your chain. when you go through the vocals, listen for clicks and pops – and when you do, find where it is on the waveform. what i like to do is use another identical part of the waveform where there is no pop, usually one or two cycles long, then copy/paste it over the pop to bandage it. you DEFINITELY want to make sure this is phase-aligned and fade-in your samples or else you’ll run into other weird artifacts like thuds and maybe even more pops.
removing mouth smacks and transitional pops: these ones are typically in between words or syllables, especially when the vocalist is singing softly. you don’t have to phase-align bandage like the previous tip for these since the section you’re editing isn’t usually tonal. 80% of the time i typically like to delete the problematic section entirely (since it’s outside of any word or adlib), with the sample-ends faded. without these managed, and when running it through heavy compression (which most likely it will), these smacks can make the vocals sound uncomfortably wet.
managing breath sounds: these are sounds the vocalist typically makes when obtaining air in the lungs to sing the following line. when unmanaged, the vocals can sound like it’s running a marathon, which usually isn’t the easiest thing to listen to. depending on the breath, you can shorten them in length or simply lower the volume only if necessary.
setting gain on sections to manually adjust dynamics: if some parts of the vocal are too loud i would turn this down to your liking. this stage is so that you are evening out the volume manually so that the compressor doesn’t do too much work.
after editing, you definitely want to bounce this into its own audio as well, so that when you time your vocal you’re managing one audio and not several cut clips.
Timing
this one’s full of trick questions, because vocals don’t look like a drum loop where the transients are easily spottable and you can simply just move a warp marker to a quantized line. vocal samples will have swells and very short hills for sibilances – here are some tips:
during a swell, the vocalist is probably saying something like “will” or “run”. i typically like to place the marker right at the beginning of the word before the R or W begin, and quantize that to your specific note. depending on the style, the W or R might act like a pickup segment, so the timing marker may be in the middle of the W or R.
for sibilances, vocalists may say stuff like “tonight”. typically, i wouldn’t place the marker at the “T”, but actually the short space between the “T” and the “O”, or right when the “O” starts. this is because in most cases, it rhythmically makes sense for the first sound of the vowel to be the beat. Of course ymmv and in some cases the “T” might be closer to the mark, so play around with this in mind and see what sound best to you.
you don’t have to time every beat, sibilance or vowel. most of the time you’ll probably just want to time the quarter or half notes, and let the rest of the notes do its own thing. if you try to be too forceful about every note they’ll start to sound too unnatural, or you’ll probably get lost in the sauce without realizing it which puts you in a position where you’re certainly prone for vocalist notes saying “hey that’s not what i intended!”
Effect Processing
vocals are probably the most effects-intensive sound in your project, because it’s so dynamic and usually is in front of the mix. i never like to mention presets because every sound and every mix varies, but i do have a set chain i’ve been sticking with so far for raw vocals (in attachment). when applied, you won’t hear a difference – you’ll have to modify each setting accordingly. these are it explained in order of signal flow.
Pre-EQ: first i cut the lows (a SOFT knee right below the vocal’s lowest fundamental), then i make large-bell changes to shape the overall tone – nothing surgical. any EQ works.
Limiter: settings are fast and threshold is high to catch rogue peaks – you don’t want any post compressors to react to these. adjust accordingly (typically setting the threshold to the highest hill of the vocals)
Compressor: to control general dynamics. i typically like to set the threshold on top of the highest hills of the verses/breakdown.
De-esser: on the chain i provided, you’ll see an audio effect rack split into two bands, and one of them is above 6khz which is where i’ll manage the sibilances. on that high band is a utility (for gain) and a fast compressor (for de-essing). when you raise the gain , you typically want the highs of your vowels to sound nicely breathy and present, but not overbearing, harsh, or sizzly. during this gain-raising stage i am only listening to the vowels, and not the sibilances. then i will move on to the compressor to manage the sibilances. i typically like to place the threshold at the foothills of the sibilances (usually smashing them with aggressive ratio and speed settings). any lower and you’ll probably get a lisp – you want to leave a little space to keep a natural sound. what i’ll also do is reduce the wetness of the compressor accordingly, so now you’re parallel compressing. the point of this is so that you get a bit of the raw sibilances and the compressed sibilances at the same time, as a result you retain both legibility of the words and the breathiness of the vowels.
Multi-band compression (ozone or some mastering multiband plugin recommended so you have more bands/settings, but you can still totally do it with stock multiband): here i’ll focus more on the mids and control the dynamics of each band here. this totally depends on the vocal (and style) so i have less of a formula on where to set your bands and compressor settings. but obviously of something seems loud or unstable, you want to control that but at the same time not going overboard as to retain natural dynamic flow and vocal legibility. in harder music, multiband compression typically gets to OTT territory but in softer and even most pop music you want the vocals to breathe much more so that they pop out of the mix better. also, while we’ve also de-essed at this point, i’ll sometimes still touch on the highs using light compression settings just as a general adjustment on this band to glue it to the mix better.
Post-EQ: this is where i’ll make final adjustments to the tone, sometimes making small-q / surgical cuts. while you can do this with any eq, you might want to use linear/no-phase eq just so you don’t get any phase issues – especially considering how upfront vocals are.
btw, this is just for the main vocals. you can certainly repeat this process for backing, doubles, harmonies and adlibs, but i find you can skip a few steps since they usually sit closer to the back in the mix. lastly, you can finally delay/reverb your vocals to your liking!
FANTASTiC
![[FL工程模板奇幻贝斯] Innovation Sounds Back At Professional Stmpd Bass House Fl Studio 20 Template(36.51MB)](https://www.shuziyinpin.vip/wp-content/uploads/2026/07/innovation-sounds-back-at-professional-stmpd-bass-house-fl-studio-20-template.png)
![[非洲浩室打击乐采样] Munchies Jukebox Afro Percussion Vol.2 [WAV](227MB)](https://www.shuziyinpin.vip/wp-content/uploads/2026/07/Afro-Percussion-Vol.2.png)
![[非洲节奏打击乐采样] Munchies Jukebox Afro Percussion Vol 1 [WAV](167.63MB)](https://www.shuziyinpin.vip/wp-content/uploads/2026/07/munchies-jukebox-afro-percussion-vol-1.png)
![[Ableton工程模板泰克诺舞曲] Innovation Sounds Fantasy Artbat and Tale Of Us Style Ableton 10 Template Vol.3(37.85MB)](https://www.shuziyinpin.vip/wp-content/uploads/2026/07/fantasy-artbat-and-tale-of-us-style-ableton-10-template-vol.3.png)
![[湿地音效FX素材] Close to Nature Music Ensemble Wetlands Sound Effects [FLAC](326MB)](https://www.shuziyinpin.vip/wp-content/uploads/2026/07/Wetlands-Sound-Effects.png)
![[感官音效FX素材] Karuna Satori ASMR The Ultimate ASMR Sound Effect Triggers [FLAC](100MB)](https://www.shuziyinpin.vip/wp-content/uploads/2026/07/Karuna-Satori-ASMR.png)

评论0